Uno dei modi più dinamici per aggiungere impatto e trasmettere istantaneamente lo scorrere del tempo nei video è la ripresa di time-lapse. In questo tutorial esploriamo le scelte chiave che hai a disposizione per girare e modificare i video time-lapse per assicurarti che abbiano un impatto visivo professionale.
Cosa imparerai
- La scelta tra scattare foto o video
- I calcoli necessari per riprendere i time-lapse
- Perché la velocità del soggetto è fondamentale
- I migliori consigli per scattare time-lapse
- Perché la qualità delle riprese è fondamentale
- I vantaggi delle immagini fisse per i time-lapse
- Come trasformare video clip standard in time-lapse
Di cosa avrai bisogno
- Una fotocamera con, idealmente, opzioni di ripresa almeno 1080p se non 4K
- Una fotocamera con controllo manuale su tutte le impostazioni di esposizione
- Un supporto per fotocamera affidabile che rimarrà fermo
- Una calcolatrice per elaborare le impostazioni di scatto necessarie
- Un computer con un software professionale per l'editing di immagini e/o video
I timelapse sono un ottimo modo creativo per indicare il passare del tempo nei video, come dal giorno alla notte, o per documentare cambiamenti come le maree che entrano ed escono o un fiore che si apre lentamente alla luce del sole. Sono spesso usati in modo creativo in TV e film.
Ad esempio, la serie poliziesca statunitense "Rizzoli &Isles" utilizza spesso brevi sequenze in timelapse per indicare il passaggio di un giorno, attraverso la notte, nel giorno successivo, mentre la serie "House of Cards" utilizza i timelapse nella sequenza dei titoli di testa.
Ma come dovresti riprendere i time-lapse e quali migliori suggerimenti e tecniche ti aiuteranno a dar loro maggiore impatto?
Modalità foto e film timelapse:come scegliere
Tradizionalmente i timelapse sono stati creati scattando una serie di immagini fisse su una fotocamera, spesso tramite un intervallometro incorporato, e poi modificandole insieme per creare un filmato timelapse. Questo ti dà il controllo su tutti i tuoi file di immagini fisse, ma può richiedere molto tempo se devi lavorarci sopra e modificarli prima di creare il time-lapse finale.
Un'opzione alternativa che si vede in alcune fotocamere attuali è una funzione/modalità filmato timelapse dedicata che può unire automaticamente le immagini fisse in un filmato timelapse.
Le fotocamere con modalità filmato timelapse integrate includono le reflex digitali Canon EOS 5D Mark IV e EOS 80D, le fotocamere full frame Panasonic S1R e S1, la reflex digitale Nikon D850 e molte altre.
- Tutorial timelapse Nikon D850:come impostare le modalità Ripresa intervallata e Filmato timelapse
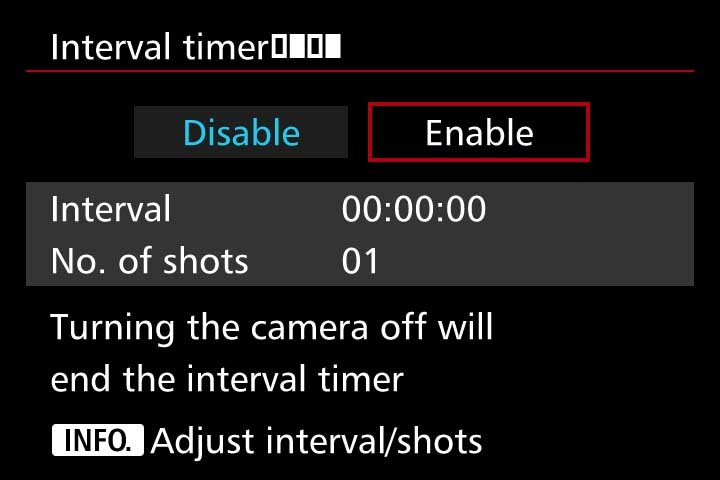
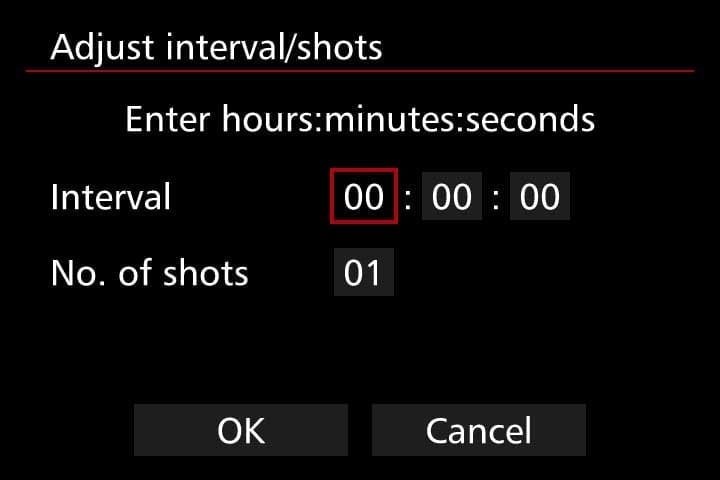
Nelle fotocamere con modalità filmato timelapse integrate, tutto ciò che devi fare è impostare i parametri per gli intervalli tra ogni scatto, il numero di scatti (il massimo disponibile varierà a seconda della fotocamera) e la durata del filmato finale, in altre parole il tempo di riproduzione.
La modalità filmato timelapse lo elabora in un film completo e salva il risultato come file video. Il lato negativo di questa modalità è che non salva le immagini come file separati durante la registrazione, quindi non hai alcun controllo sulla modifica delle singole immagini.
There are also timelapse specific outdoor cameras such as the Brinno TLC200, which simply requires you to turn it on, set your interval, pick your subject, record and then replay your timelapse videos in-camera.

7 key tips for timelapse videos
There are certain technical considerations and parameters that you need to remember for shooting timelapses:
- As you’re creating a video, for every one second of video you’ll need to capture between 24 and 30 frames. For example, if you’re shooting 12 hours of timelapse and you take a still every minute you’ll end up with 720 still images and, at 24fps, you’ll get a 30 second timelapse. It’s best to plan how long you’d like your final timelapse clip to be and then you can do the maths to work out how best to shoot it.
- You must always consider the speed of your subject when deciding on the intervals between each shot. For fast moving subjects, such as cars or people, this will probably be well under one second whilst documenting a slowly changing landscape may only require a few shots, or a few dozen shots, per day.
- Always do a series of test shots to see if your framing, exposure settings and the chosen intervals between each still image will work. I would recommend setting exposure manually, or at least using aperture priority, so you can guarantee that you retain full control of exactly what the camera will shoot when you are not behind the lens. Relying on any auto settings can cause unwanted things, like flicker, in your final timelapse footage.
- Decide on whether to shoot your stills as JPEGs or as RAW files. If you’re planning a 1080p HD movie JPEGS should be of sufficient quality but if you want your timelapse edit to be any quality above 1080p then shooting RAW files is the best option. Shooting RAW will also give you the flexibility to edit the colours in post or to zoom in or crop on the original image files. This is simply because RAW image files ‘hold’ more information and thus will give you more flexibility at the editing stage.
- If your camera gives you the option to select a 16:9 shooting ratio it’s probably best to do so – this is the traditional cinema ratio, so the result will look more natural in a movie edit.
- A steady camera is essential for timelapses, so always use a tripod. Check to make sure it is level before setting your camera to shoot so you avoid having to straighten out any footage in post-production.
- If your camera doesn’t have an intervalometer or a built-in timelapse video function you should consider using an external remote controller for your camera or even an interval shooting app. There are a few apps available for cameras and smartphones, so just check which one is compatible with your camera or phone. Examples of such apps include Framelapse, Lapse It, Hyperlapse and iMotion.
Quality of footage &exposure length
As mentioned earlier many modern cameras offer timelapse shooting functions but, up until a couple of years ago, the downside of this was that their maximum footage resolution is just 1080p. You must decide on the quality of final footage you want before choosing such a mode or opting to shoot higher res stills and edit them together in post.
The other factor to weight up when considering to shoot stills or video for timelapses is that stills will offer you the flexibility to play with exposure times. As mentioned, shooting video means you must shoot at least 24 frames per second, so no exposure can be longer than 1/24th of a second.
In contrast shooting stills gives the flexibility to shoot longer exposures and, as a direct result, you’ll potentially get timelapses with much more impact, such as star trails or car headlights at night.
How to change standard video clips to timelapses
Whilst the advice and tips mentioned earlier in this blog are the ‘traditional’ ways of shooting timelapses, there is another way… converting standard video clips into a timelapse. Many desktop video-editing suites will allow you to convert a standard clip into a timelapse movie.
For example, in Adobe Premiere Pro, you can adjust the frame rate of a standard video clip in a way that does so by ‘posterizing’ or separating the frames. So, you could adjust a 24fps video to, say, 1fps, which will give a more ‘jumpy’ effect.
You then need to adjust the clip speed/duration (say 800%) of each frame upwards so as to alter the time between each frame, in this case eight times faster. You can experiment with the speed so you get the best look out of your clip. This speed adjustment will result in a sort of stop-motion or timelapse/hyperlapse effect.
If you decide to try this route it’s best to work with clips of around one minute in length and upwards so that you have more information to work with, otherwise you could end up with a very short timelapse clip.

Keep experimenting
Like many choices when shooting video footage you have to marry up the practical side of camera settings and what you want the creative, final result to be. If you’re a newcomer to shooting timelapses it’s perhaps best to start simple and shoot a flower opening. You can then expand this to day to night timelapses and those of moving subjects.
Whatever option you choose for shooting timelapses if you follow the tips outlined above and choose a great subject you should, hopefully, end up with a great piece of timelapse footage. Keep experimenting with different subjects, different lighting situations and different camera settings and you should quickly end up with some timelapses with that are full of visual impact and tell a story.
