Camtasia è un programma di editing video ricco di funzionalità e popolare. Questa pagina ti fornirà una panoramica completa di Camtasia in termini di prezzo, interfaccia, funzionalità e così via.
Recensione di Camtasia
Camtasia è un software di editing video multifunzionale e facile da imparare rilasciato da TechSmith Company degli Stati Uniti. Può essere utilizzato per l'editing video, l'editing audio, l'aggiunta di narrazioni, annotazioni chiave, creazione di menu, registrazione PPT, registrazione dello schermo del computer, riproduzione video, ecc.
In generale, è difficile considerare sia le funzioni ricche che le operazioni semplici. Ma Camtasia lo ha fatto, il che ha sorpreso molti utenti. Non ci sono molte barre dei menu nell'interfaccia, ma sono molto raffinate, il che è molto comodo per trovare le funzioni di cui hai bisogno. Ti consente di tagliare clip video, aggiungere effetti di transizione, ingrandire immagini locali, illustrazioni o aggiungere effetti picture-in-picture e altro ancora. Allo stesso tempo, i suoi formati di output includono MP4, AVI, WMV, M4V, CAMV, MOV, RM, animazioni GIF e molti altri formati comuni, che possono essere considerati un eccellente programma per realizzare presentazioni video.
Altre ultime recensioni :Recensione LumaFusion, Recensione VideoPad, Recensione iMovie
(Lo schermo lampeggia all'apertura del programma)
Pro e contro
Camtasia è un ottimo punto di partenza per i nuovi editor. È anche un ottimo software per la registrazione, lo screencasting e la proiezione di tutorial.
PROFESSIONISTI
- Il flusso di lavoro è semplice e facile per i nuovi arrivati per iniziare.
- Un sito Web di tutorial dedicato (https://www.techsmith.com/learn/tutorials/camtasia/) è disponibile per consentire agli utenti di apprendere in qualsiasi momento.
- Supporta il collegamento di immagini e clip video in molti formati nei film.
- Quindi il processo di registrazione dello schermo può essere messo in pausa e riavviato in qualsiasi momento per ridurre il tempo di modifica successivo.
- Un servizio clienti reattivo migliora la tua esperienza.
- Risoluzione fino a 4K.
CONTRO
- È relativamente costoso e richiede costi aggiuntivi per l'aggiornamento del software.
- A volte si verificherà un arresto anomalo nel processo di registrazione.
- Filigrana (versione gratuita).
Prezzi
Sebbene Camtasia sia un software a pagamento, gli utenti possono usufruire di un periodo di prova gratuito di 30 giorni. Questo ti dà un sacco di tempo per pensare se vuoi spendere $ 299,99 su di esso.

Listino prezzi Camtasia
Come ottenere Camtasia
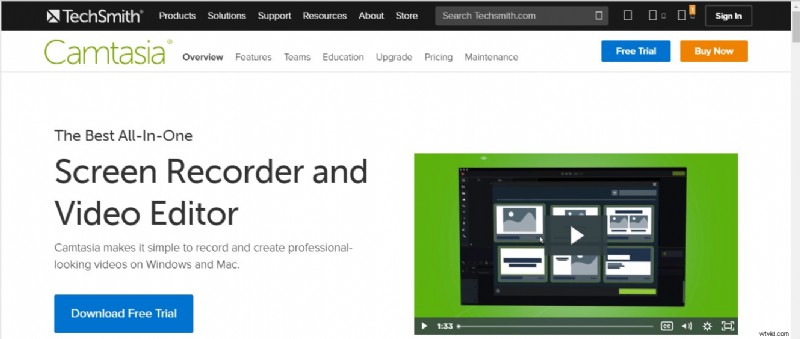
Accedi al sito Web ufficiale di Camtasia per scaricare direttamente per evitare l'invasione di software in bundle o software antivirus.
Collegamento al sito Web ufficiale:https://www.techsmith.com/video-editor.html
Scarica Camtasia
Interfaccia principale
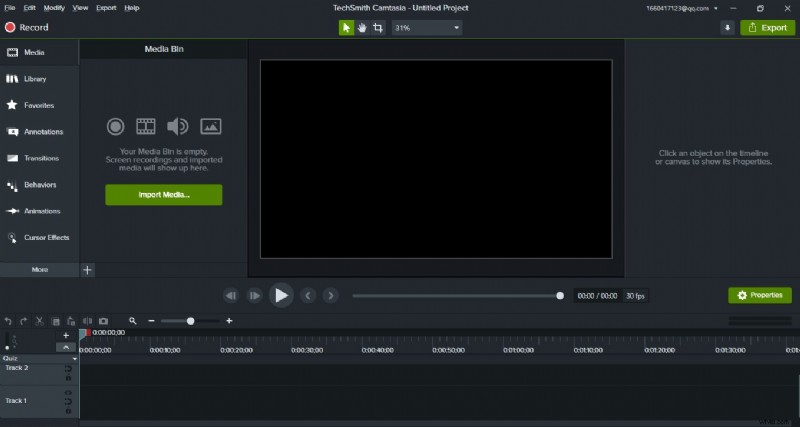
Quando entri nell'interfaccia principale di Camtasia, sei accolto da quattro grandi pannelli partizionati:la barra degli strumenti, la finestra di anteprima video, la barra degli strumenti delle proprietà e il pannello della sequenza temporale.
Quattro visualizzazioni di partizione dell'interfaccia principale.
Interfaccia principale di Camtasia
Barra degli strumenti
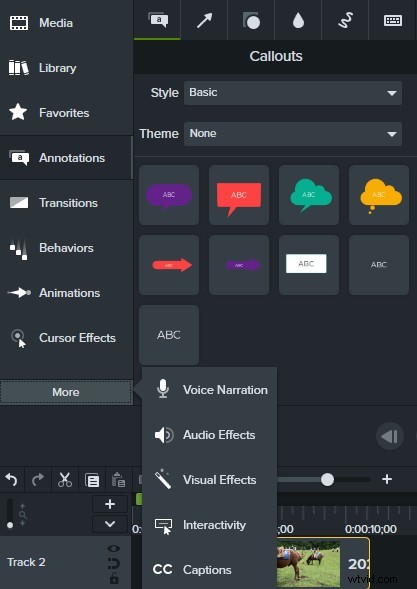
La barra degli strumenti è, come suggerisce il nome, un riepilogo di tutti i pulsanti funzione utilizzati nel processo di editing video. Possiamo vedere che anche questa sezione è divisa in due parti. Sulla sinistra c'è l'elenco delle funzioni e sulla destra c'è l'area di visualizzazione, Camtasia ha suddiviso tutte le funzioni in 13 categorie:
- Media :Posiziona tutti i materiali importati, inclusi audio, video, materiali PPT, ecc. Puoi modificare il layout del materiale regolando la piccola icona in basso a destra.
- Libreria :L'animazione e il logo di Camtasia sono facili da ottenere per gli utenti.
- Preferiti :raccogli annotazioni o effetti facendo clic sull'icona a forma di stella.
- Annotazioni :aggiungi annotazioni e identificazione della forma al video o crea un effetto mosaico regolando il colore e la sfocatura.
- Transizioni :aggiungi effetti di transizione per rendere ogni fotogramma più naturale.
- Comportamenti :Utilizzato principalmente per aggiungere effetti di animazione a testo o video.
- Animazioni :regola gli effetti di zoom, traslazione, rotazione o inclinazione dell'immagine video.
- Effetti cursore :Aggiungi un cursore al mouse per evidenziare il tracciamento del movimento del mouse.
- Narrazione vocale :per registrare la narrazione vocale.
- Effetti audio :rimuovi il rumore per l'audio o aggiungi effetti di dissolvenza in apertura e in chiusura.
- Effetti visivi :aggiungi bordi, rimuovi colori e accelera o rallenta la velocità del video.
- Interattività :aggiungi un quiz per vedere chi sta guardando il video e i suoi progressi.
- Sottotitoli :aggiungi i sottotitoli al video.
La potente cassetta degli attrezzi
Finestra anteprima video
Nella finestra di anteprima, puoi visualizzare in anteprima non solo i clip sulla timeline ma anche i diversi effetti. Ci sono quattro pulsanti principali:il pulsante Modifica (per spostare il file multimediale, ridimensionare o ruotare lo schermo), il pulsante Panoramica (o semplicemente tenere premuta la barra spaziatrice per trascinare lo schermo per ottenere una visualizzazione migliore), il pulsante Ritaglia (o basta tenere premuto il tasto Alt per ritagliare aree indesiderate dello schermo) e ridimensionare e ridimensionare la tela. Convenientemente sotto la finestra di anteprima di Camtasia ci sono i pulsanti di riproduzione, pausa e la durata totale del video.
The scale of the screen can be adjusted with the mouse wheel.
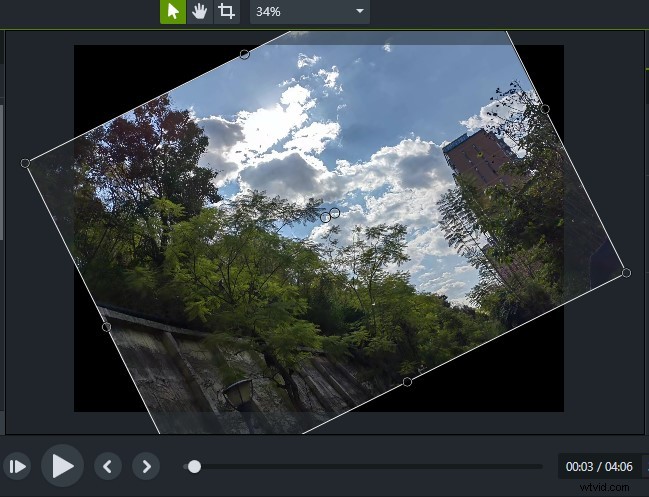
Camtasia Preview Window
Properties Toolbar
On the right-hand side of the main Camtasia screen, there is a prominent little green box – Properties. Here you can not only see the current settings of the selected screen. You can also set and adjust the Scale, Opacity, Rotation, Position, Width, and Height of the target. This column is also very important during the operation. (Hide with two clicks)
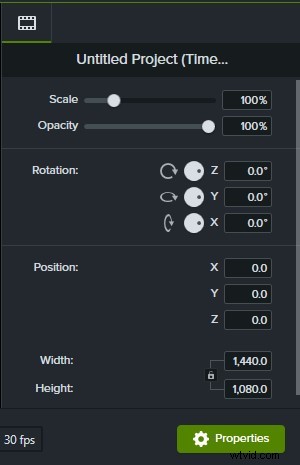
Camtasia Properties
Pannello sequenza temporale
There are two main ways to add the timeline in Camtasia. The first one is to drag the material directly from the material library to the timeline. The second is to click “+” on the left side of the timeline panel to add it. At the same time, the arrow buttons in the upper left and right directions have the functions of undo and return respectively, which gives you a chance to try and make mistakes. Here, cutting and segmentation are two functions that are easily confused. When you drag the cursor of the timeline to a picture, if you click Cut, the whole picture will disappear. If you click the split button, that picture will be split into two separate frames. The Copy and Paste buttons are the same as the Copy and Paste function we use every day. It can copy the effect or animation to the clipboard and paste it to the position you need. The active axis next to the magnifying glass icon can zoom in and out the entire timeline, which is used to adjust the time interval gap. This is very necessary when intensive care is needed. Similarly, the vertical movable axis on the left can adjust the height of each time axis. In the timeline, you can hide, lock, and enable the tracks on the timeline.
Use the red and green cursors above the timeline to Mark or add Quiz.

Camtasia Timeline Panel
Screen Recording
Camtasia’s best feature is the screen recording function, which can be regarded as one of the best software on the market at present, and it is in line with industry standards.
Click Record (shortcut Ctrl+R) on the top left of the main interface to directly enter the screen recording field. Then a small black box appears on your screen. Take Camtasia 2021 as an example. After clicking, there will be five parts:Screen, Integrated camera, Conexant SmartAudio HD, System Audio, and a Start button. You can accept the system’s default full-screen recording settings or choose to customize the screen recording range. Click on the drop-down arrow of the screen box and you will see more options. Clicking on Custom Region will allow you to make your screen size selection just like a screenshot. A preset window (16:9) will also be available in the software. If your recorded media will eventually be posted to Instagram or Facebook, Camtasia is kind enough to offer you a choice of platform-compliant options. Whether you turn the camera on or off is up to you. You can choose to turn the camera off when you are presenting a PowerPoint or tutorial and turn it on when you broadcast live. Also, if you only want to record your voice, you can simply turn off the System Audio option. So that some system sounds don’t make the whole video noisy. The microphone’s sound can be adjusted in size depending on the situation, usually with the option to turn the volume to maximum. Some preferences can also be set via Tool. Once all the details have been adjusted you can record directly by clicking the red button (shortcut F9). Camtasia allows you to pause the recording at any time after it has started, a feature that effectively saves some of the subsequent editing time. Click the Stop button (shortcut F10) when the recording is finished. The recorded material will be automatically saved to the Camtasia media pool and timeline. If there are frequent errors or unexpected situations during the recording process, you can delete them by clicking the Delete button and the interface will revert to the previous recording frame settings panel.
After recording with the use of Cursor Effects can highlight an area or clear mouse click position.

Camtasia Screen Recording
Audio Effects
When you import a piece of audio into Camtasia, you will see a green horizontal line on the timeline, which you can pull to adjust the sound level of the entire audio directly. Select Audio Effects in the toolbar to add effects directly to the audio. For example, you can embed a Fade in or Fade out sound effect at the beginning or the end. When you want to highlight the climax, you can add Emphasize sound effects, etc. The most noteworthy is the Noise Removal. Just drag it onto the entire audio and the system will automatically do the noise removal for you. This is very convenient and fast. Although Camtasia’s built-in settings for sound adjustments are limited and not up to the professional standards. But for most users, it can already meet their daily needs.
Slow playing sound can also play a role in setting off the atmosphere.

Camtasia Audio Effects
Interactivity
The interactive function of Camtasia is also very powerful. This is very suitable for teachers and some other online education lecturers. You can set the Quiz in the middle or the end of a course, change the quiz name in Properties, select the quiz type, set questions and answers, and check Display Feedback. Finally, you will find that you can adjust the follow-up of whether you answered correctly or not. If answerers don’t fill out the correct answer, you can set the video to automatically turn to a certain place to review again. And Camtasia allows you to set multiple questions. At the same time, viewers can also get happiness from multiple-choice, fill in the blank, short answers, and true/false.
This feature can be effective in keeping you focused during the viewing process.
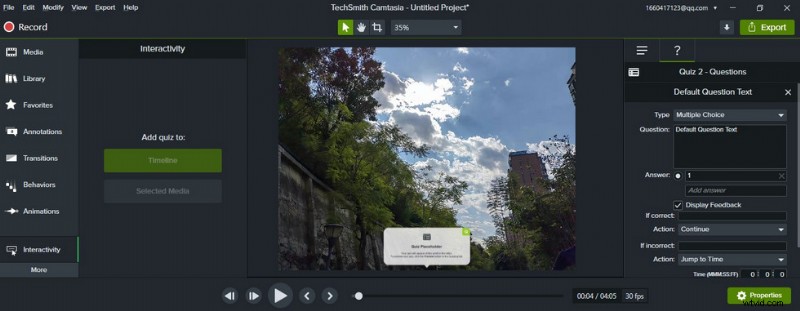
Camtasia Interactivity
Animations
The Animations feature in Camtasia can be used to enhance the viewing experience by zooming in, zooming out, rotating, and other effects to emphasize a screen, video, or commentary. Camtasia has 10 built-in Animations effects, which are similar to a camera lens zooming in for a close-up effect. The principle of each effect is similar except for Full Opacity and No Opacity, which are transparency adjustments. Select an effect and drag it to the clip-on top of the timeline. At this point, an arrow icon will appear on the timeline, which means it was successfully added. Click Zoom-n-Pan in the function bar to select the range where you want to generate the effect. If you want to revert to the original scale in subsequent playback, just click Scale to fit. You can change the time of the zoomed-in and zoomed-out effects by directly elongating or shortening the arrows on the timeline.
Partial zoom animation show effect.
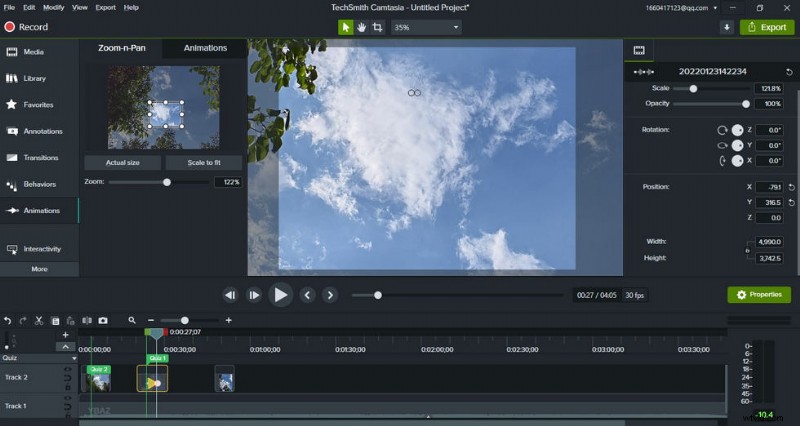
Camtasia Animations
Export
Once you’ve finished your clip and made sure it’s error-free, you can then export your entire work. Click directly on the Export option at the top and you’ll find that Camtasia gives you a variety of options for exporting and sharing:Local File, Screencast.com, Knowmia, TechSmith Video Review, Vimeo, YouTube, and Google Drive. You can also export a clip or audio separately.
The exported video formats are mainly MP4, WMV, AVI, GIF, M4A, WAV (Windows); or MP4, MOV, GIF, M4A, WAV (Mac). You can set the video size, frame rate, encoding mode, color mode, and other related specific parameters independently. Preview available before export.
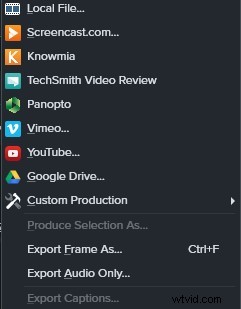
Camtasia Export
Assistenza dispositivi
Camtasia can run on both Windows and Mac.
Notes:
Windows 7 and below no longer support Camtasia 9.0 and above.
Windows 7/Windows XP please download version 3.0.
Is Camtasia Worth Purchasing?
All in all, Camtasia is a piece of very user-friendly video editing software. Its simple interface and rich training resources make your editing journey enjoyable and easy. Therefore, it is perfect for newcomers to the world of video editing. Camtasia can help you create training videos, explainer videos, live game recordings, video conference recordings, and more. This powerful feature is worth pursuing even for professionals.
Camtasia is designed to promote “Everyone can make a great looking video” to encourage all users to give it a try. 30 days trial period is set up to allow you to fully understand and experience Camtasia before deciding whether you want to purchase the Subscription.
Altri articoli correlati
- I 10 migliori convertitori da MP4 a MP3
- Le migliori alternative a Windows Movie Maker
- Le 3 migliori app per convertire YouTube in MP3 per iPhone
- 10 software Chroma Key consigliati
- I 12 migliori software di editing video per YouTube
