Creare video non è un lavoro facile. Dalla creazione di script alla registrazione, modifica e gestione del tuo canale, c'è molto di cui occuparsi. Oltre a questo, attirare l'attenzione dei tuoi spettatori è una competizione spietata. Tuttavia, un video introduttivo eccezionale è un modo perfetto per rimanere coinvolgente e per farlo bene, tutto ciò di cui hai bisogno è un buon creatore di intro e outro per YouTube.
O probabilmente, uno strumento video all-in-one che potrebbe farti risparmiare il tempo di creare intro e outro impressionanti e far funzionare le cose in pochissimo tempo. Prima di entrare nel merito di come creare intro e outro per i tuoi video. Per prima cosa, comprendiamo le basi.
Cosa sono Intro e Outro?
Intro e Outro sono clip realizzati con grafica ad alta risoluzione. Un'introduzione è il segmento iniziale o di apertura del video, mentre un outro è il segmento finale o di chiusura del video.
- Un segmento di introduzione include loghi di brand o introduzioni per il branding.
- Un segmento di chiusura include elementi che rafforzano il marchio e di solito hanno un invito all'azione (Call to Action).
Panoramica delle introduzioni
Le introduzioni sono spesso note come "video bumper ”, che consiste nel catturare l'attenzione degli spettatori e rafforzare il marchio. Le introduzioni sono il modo perfetto per aumentare la qualità complessiva del video. Anche se il tuo video non ha una grafica elegante o forse è solo girato con uno smartphone, una buona introduzione può fare la differenza.
Inoltre, tieni presente che non tutti i video avranno bisogno di introduzioni. Questo di solito è determinato in base alla lunghezza del video e al punto in cui viene visualizzato.
Panoramica degli Outro
Gli outro sono anche conosciuti come "endslates ” e sono un ottimo modo per aumentare la brand awareness e attivare la CTA (Call to Action). Ma c'è un trucco qui:a meno che i tuoi segmenti introduttivi e di contenuto non siano coinvolgenti, non incoraggerà mai i tuoi spettatori a intraprendere alcuna azione sugli elementi nel segmento finale.
Un invito all'azione potrebbe riguardare qualsiasi cosa che possa coinvolgere gli spettatori a compiere ulteriori passi con il tuo brand.
Potrebbe trattarsi di qualsiasi azione come fare un acquisto, scaricare un ebook, vedere una guida gratuita, leggere un blog, chiamare un numero di telefono, visitare un sito web, controllare gli handle dei social media e molto altro.
Typito:perché è il miglior creatore di intro e outro per YouTube
YouTube è una delle piattaforme di condivisione video più famose al mondo e trovare una base di spettatori coerente è essenziale per il successo. Onestamente, trovare il proprio piede nella crescente tribù di creatori di video può essere un po' complicato ma non impossibile.
Creare video intuitivi ed essere fedeli alle aspettative del pubblico è la ricetta ideale per diventare uno YouTuber di successo.
Quando diciamo "video intuitivi", si tratta di creare video con inizi e finali espliciti. Le creazioni amatoriali con inizi incerti e finali bruschi saboteranno solo i tuoi livelli di coinvolgimento e, alla fine, il conteggio delle visualizzazioni. È qui che entra in gioco il concetto di "Intro" e "Outro".
Considerando l'attuale mondo digitale, creare intro e outro eccezionali è un gioco da ragazzi. Tutto ciò di cui hai bisogno è un buon creatore di intro e outro per YouTube.
Ti presentiamo Typito, uno strumento di progettazione video all-in-one che ti aiuta a creare video straordinari più velocemente senza dover apprendere alcuna abilità di editing video.
Con Typito, creare intro e outro per i tuoi video di YouTube è semplice e diretto. Dispone di modelli di testo con grafica animata predefiniti, una libreria musicale e stili di carattere per consentirti di svolgere rapidamente tutto il lavoro in meno di 15 minuti.
Per mantenere le cose chiare e precise, abbiamo diviso questo tutorial in due sezioni:
- Sezione 1: Creazione di intro per i video di YouTube con Typito
- Sezione 2: Creazione di outro per i video di YouTube con Typito
Allora, cominciamo.
Sezione 1:creazione di intro per i video di YouTube con Typito
Ecco un processo passo dopo passo per farlo bene.
Passaggio 1:accedi e scegli il formato video per YouTube
Vai su typito.com e registrati o accedi al tuo account. Nella home page, fai clic sul pulsante Nuovo progetto dall'angolo in alto a destra.
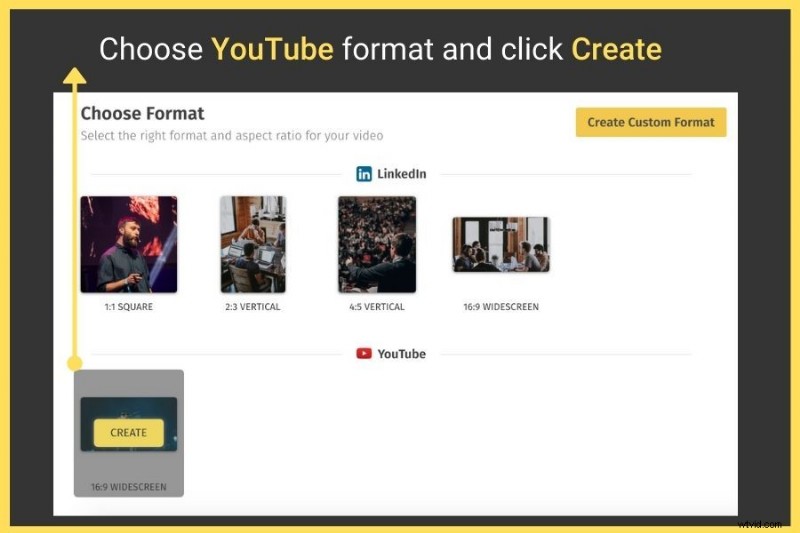
Scegli il formato video per Youtube dai vari formati disponibili e fai clic su Crea.
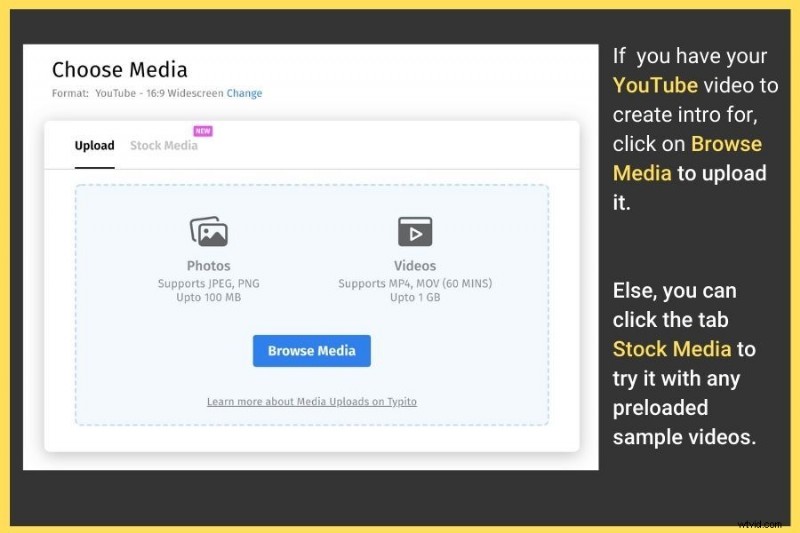
Quindi, carica il tuo video dal tuo computer. Se hai già un video di YouTube per il quale devi creare un'introduzione, fai clic su Sfoglia media per caricarlo.
Se desideri creare un video, puoi fare clic sulla scheda Supporti stock e scegli uno dei video stock precaricati, per provarlo con i filmati stock.
Una volta fatto. Fai clic su Crea progetto .
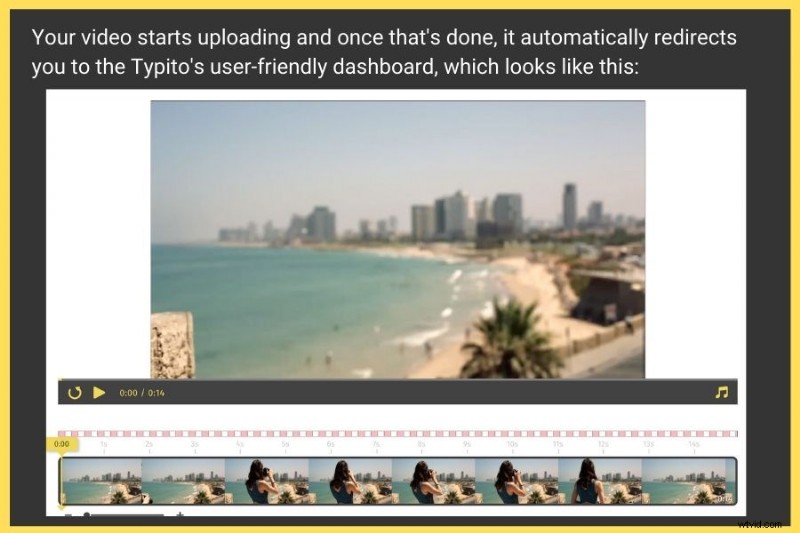
Una volta che il tuo file è stato caricato, questo ti reindirizzerà alla dashboard di modifica intuitiva di Typito.
Passaggio 2. Scegli tra una serie di modelli introduttivi
Una splendida introduzione non solo imposta il tempo per il tuo video di YouTube, ma assicura anche che sia coinvolgente.
Il tuo titolo di introduzione animato avrà bisogno di un logo animato di complimento in modo che si presenti al pubblico. È interessante notare che Typito ti ha coperto per questo.
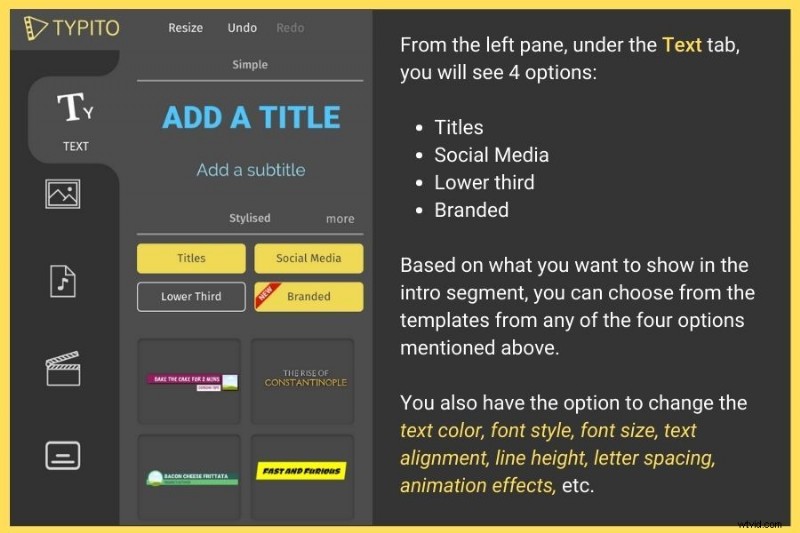
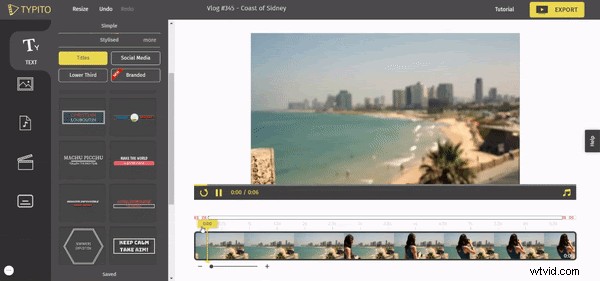
Nel riquadro di sinistra, fai clic sulla scheda "Testo" per scegliere tra una serie di modelli introduttivi adatti al tuo video.
Nota: Indipendentemente dall'opzione scelta, avrai la possibilità di modificare il colore del testo, lo stile del carattere, la dimensione del carattere, l'allineamento del testo, l'altezza della riga, la spaziatura delle lettere, gli effetti di animazione e molto altro.
Vai alla nostra pagina dei modelli di introduzione e scegli il tuo preferito dall'elenco di modelli di grafica animata predefiniti, che ritieni fortemente si accompagneranno al tuo canale YouTube e ai contenuti che crei. Se sei nuovo nella creazione di video e non hai idea di come creare intro per i tuoi video di YouTube, ecco cosa puoi fare rapidamente.
È interessante passare il mouse su uno qualsiasi di questi modelli di grafica animata ti mostrerà rapidamente come si animerà e lo mostrerà agli utenti. Questo non solo ti dà un quadro completo, ma accelera anche il tuo processo decisionale.
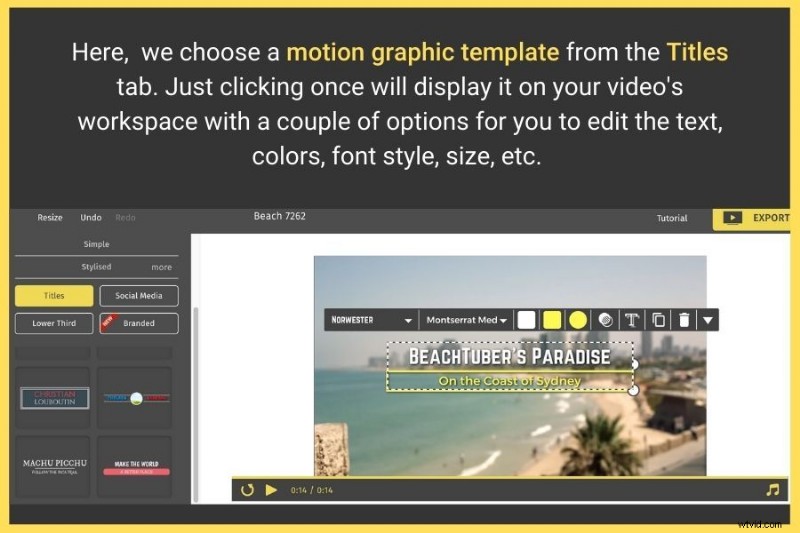
Se hai deciso quale modello introduttivo utilizzare, fai clic su di esso una volta e verrai reindirizzato a un'anteprima di come apparirà sul video di YouTube.
You will see two buttons on the right, which are:
- Use the template: This will transport the motion graphic template to the video directly.
- Save: This will save the chosen template on your account so that you can use it whenever required.
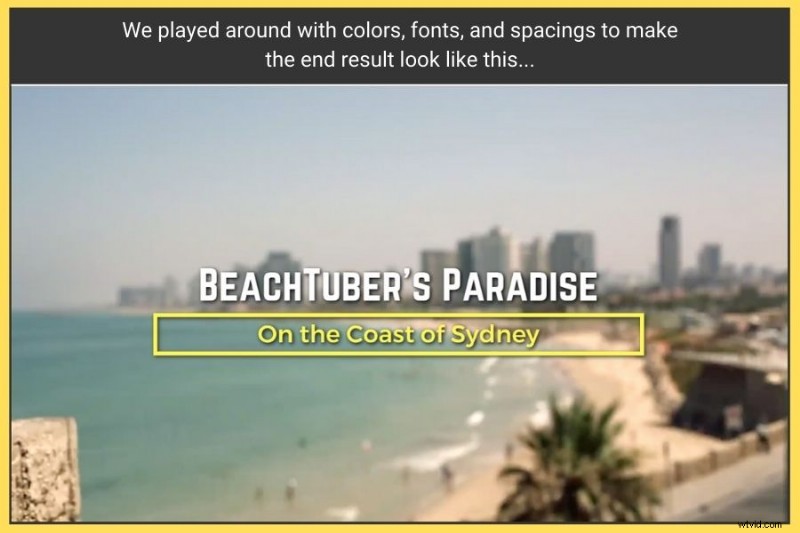
Note: After you click the “use the template ” button, it will be automatically placed on the video waiting for you to edit. You can play around with colors, change the font style, size, adjust the letter &line spacing, and much more.
Step 3:Add some music to the intro segment
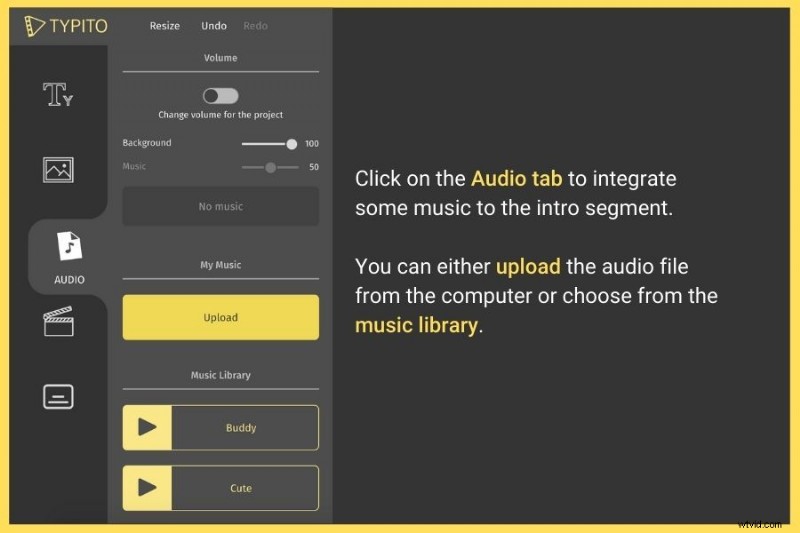
Here's where you can make your intro's a lot more interesting. Besides giving you a lot of predefined motion graphics templates, Typito also offers the option of adding audio to the intro background, which again can be:
- Uploaded from your computer drive, or
- Chosen from the music library . All you have to do is click the track to apply it to your video
Step 4:Export the video file
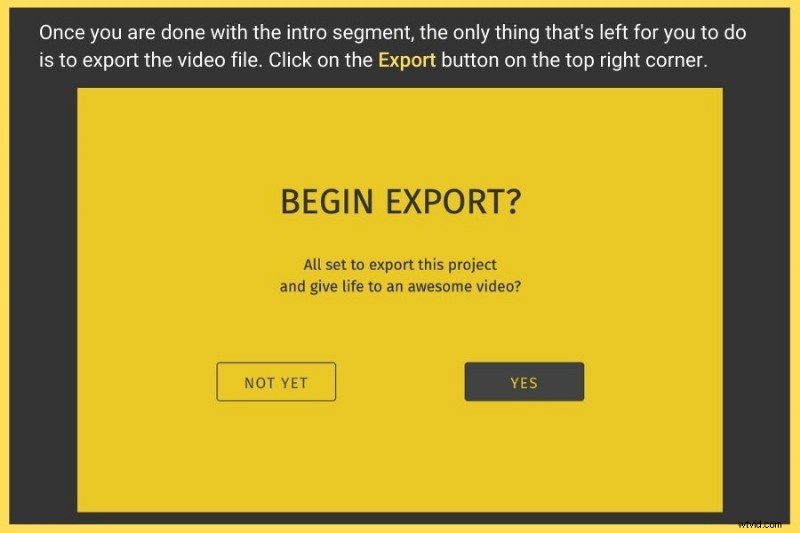
After you have completed the intro segment, all you have to do is export the video file. To do this, click the Export button in the top right corner.
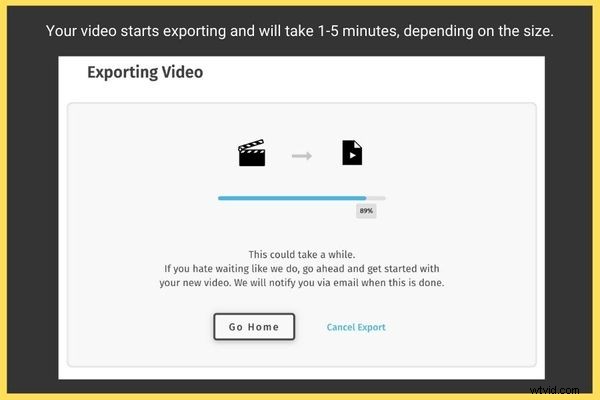
The exporting process begins, and the time to complete this depends on your video size.
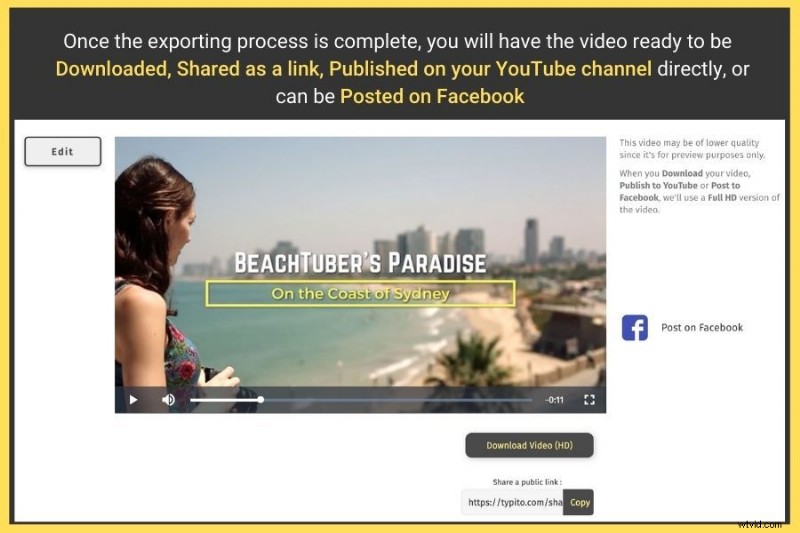
Once the exporting process is complete, you will have the video ready to be:
- Downloaded
- Shared as a link
- Published on your YouTube channel directly
- Posted on Facebook
Section 2:Creating Outros for YouTube Videos with Typito
An engaging intro and content segment has the power to make your viewers click on the CTA in the outro section—which could be anywhere from making them shop on a website, visiting a specific link to downloading an ebook, exploring your social accounts, or making them watch more of your YouTube videos .
Here’s a step by step process to do this correctly.
Note: We are skipping Step #1, as it's the same as mentioned above.
Step 1:Choose from an array of outro templates
Whether you want to give that extra little push to get your viewers to hit the subscribe button or explore your social accounts or watch other videos, Typito helps you do it with ease.
Since outros entail a CTA, they can usually be:
- Outro templates
- Social media templates
- Combination of the above
For example, we chose a template from the Social Media tab, and came with an outro like the one below.
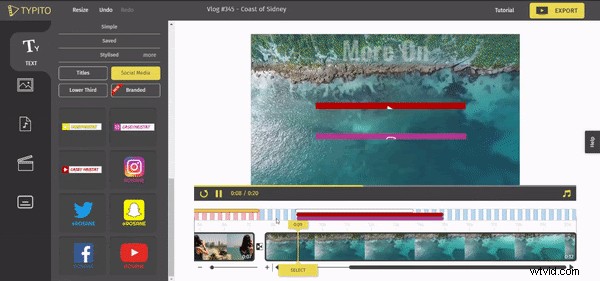
Perhaps, you can quickly go to our outro templates page and choose an appropriate predefined motion graphics template that ideally suits your video design. Click Save to add it to your editing dashboard.
Step 2:Add some music and export the video file
Again, you can add a different audio clip or music to the outro along with the CTA. After you’re done, just export the video file.
Quick Tip: Create your intro and outro on Typito separately and save it so that you can merge it with your video content at the beginning and the end.
However, if you have varying intros and outros most of the time, the ideal option is to work the video altogether in Typito and export it. The beauty of this tool is that you can log in and edit it anytime.
From allowing you to cut or merge clips, adding captions, motion graphics, overlay titles to integrating music, highlighting social media handles, and CTAs, Typito lets even the rookie editors create magic. Not everyone has the technical skills or the money to use expensive tools like Adobe After Effects or Final Cut Pro .
With typito, the best intro and outro maker for YouTube, things become fast and simplified. The key reason is due to the handy intro and outro templates, which let you create professional yet stunning videos without the help of video editing expertise. It takes only 10-20 minutes or even less.
What is the Importance of an Intro in a Video?
- Keep things professional: The current audience is more inclined to watching well-created videos, which features eye-catching intros. In order to stay up-to-date with video executions, it’s vital that you amalgamate contemporary design elements to meet the user expectations.
- Increases brand trust: Speaking of YouTube videos in specific, it’s all about Personal Branding, and when you manage to place an amazing intro in every video, the chances for a brand recall increases whenever your viewers encounter your brand. Be consistent with your content formats, as this creates trust and positive expectations with your brand.
- Solves declining audience attention span time: The challenge for any creator with videos revolves around “audience attention span” whose lasting time should be at least 7 seconds. Now, a crisp and small intro of about 5-10 seconds can be made just to accomplish this to ensure that your viewers get a heads-up of what they are going to watch. A no-intro or an extended intro both can be a huge turn-off for your viewers to opt-out from your video altogether.
- Video marketing: This is a huge online phenomenon, which continues to grow. With videos getting maximum attention these days, everyone is after user attention and that’s why you, as a creator or brand, should stay focused on the conventional methods while working with an intro and outro maker for YouTube. Digressing the standard formats increases the chances of rejection.
What is the Importance of an Outro in a Video?
- Retains the viewers on the channel: Speaking of YouTube videos specifically, your views matter a lot. That’s what makes you successful as a whole. Therefore, your audience must stay hooked onto your videos, which can be achieved by creating a strategic outro segment highlighting your past videos’ links. This is one of the smart ways to increase views of your videos.
- It helps viewers act on the CTA (Call to Action): Abrupt video endings can be unpleasant. To keep your outro segment engaging, ensure that you include CTA(s) at the end of the screen to persuade your viewers to do an activity. Now, this could be from making them click on your website link, subscribing to your channel, or purchasing your products.
- Increases your followers on social media: This is important, especially if you are a blogger or someone who is into personal branding and would want viewers to explore your social media handles. To do this, you can strategically showcase the Outro’s social account details and gain a good follower count.
- Creates a connection between your brand and viewers: Adding some creative design elements to your logo and brand content can give a distinct sign-off for your outro. This means whenever your video concludes; viewers will be able to establish a connection with your channel. If you look at this long-term, it resonates with people to recall the brand and identify it. Just put in some effort to create a strong brand identity—something that could leave a long-lasting impression with your outro.
Now that you know how to work with this intro and outro maker for YouTube videos and are aware of the elements that go into intros and outros let’s get into our final segment that highlights some more tips to ensure that you have a professional video created.
Tips and Tricks to Create an Effective Intro Segment
Sometimes too many choices can feel like a curse. The scenario is true when you are starting but, the key lies in understanding what you are looking for. If you are clear with your requirements, you can use the template, which suits your needs.
Here are some pro tips to always remember:
- Follow the C.R.A.P strategy: If you have read this blog, you know what we are talking about. C.R.A.P is a concept that revolves around four crucial factors—Contrast, Repetition, Alignment, and Proximity —and you might want to follow it if you’re going to create stunning intro segments. Designed by Robin Williams, C.R.A.P is not just a framework that’s easy to remember but also dissects the issue of creating intros.
- Have all that it takes to create a first impression: Your intro should be able to make an impression within 5 seconds, as that’s the timeframe viewers take to decide whether they want to watch the video or not. Yes, that’s a tight window to achieve the goal, but most YouTubers manage to. So it’s not impossible. Focus on your brand’s core essence—“who you are ,” and “what you offer .” Pick a nice, bold template to keep this succinct and focused.
- Pay attention to the style quotient: It is relatively easy to get confused with the whole bunch of customizable features that Typito provides, but keep in mind, the key is to create videos that are brand-compliant. Use text fonts and colors that match your logo and brand color scheme.
- Don’t forget the context: To keep your video intros creative and help your viewers have a glimpse of what they will learn, try adding a bold title template along with a small space for the caption. This is handy, especially if you have different segments or multiple video categories.
Conclusion
Every YouTube channel serves a purpose. This could be to create brand awareness, build customer relationships, or promote their products to their target audience for many businesses. On the other hand, for individual YouTubers, this could be for fan following, affiliate marketing, social media traffic generation, and much more.
No matter what the reason is, you need viewers to see it. To get them to watch your videos and take action, having a strong intro &outro matters. Neglecting both these aspects calls for a missed opportunity to take your brand a step further.
With typito’, intros and outros are easy to create. Our ready-made motion graphic templates are waiting for you! Increase your YouTube channel’s ROI now!
